Showing posts with label mountain. Show all posts

Friday, March 21, 2014

Mt Pico de Loro and the Parrot's Beak - Ternate, Cavite Route


Mt Pico de Loro is not new to me as this is already my second time to conquer this mountain. But like what every mountaineers say, every hike is different. The difference of this hike were 1) unlike my first climb, I only went there for a day hike. Now I'll be staying for an overnight. 2) We did a night trek going up and 3) lastly, I climbed the monolith slash the famous Parrot's Beak.

Just to give you a short background, Mt Pico de Loro (also called as Mt Palay Palay) is situated in the boundaries of Cavite and Batangas. While having said that, trekkers who wanted to climb Mt. Pico de Loro have a choice whether they'll start on the jump off point in Nasugbo, Batangas or the one which is located in Ternate, Cavite. Cool huh? Also, in Cavite it is considered to be as the highest point with a topography of 664 MASL (according to Pinoy Mountaineers).

How to get there?
Well since most of us in this trip were Cavitenos, we started our adventure on the jump off point located in Ternate, Cavite. Going there is just plain and simple. From Baclaran or Coastal Mall Terminal, ride a bus with a signboard going to Ternate. Tip: Make sure that it will passed through Cavitex as that is a much faster way to reach Ternate. You'll be dropping off at the last point which is the Ternate Terminal so getting lost on the way is impossible. Lols! Bus fare is 84 pesos and it will take 2-3 hours. Alight at Ternate Bus Terminal, you can rent a tricycle for 75 pesos per head or a jeepney (didn't know the price) going to the jump off point/registration area of Mt. Pico de Loro. Renting a tricycle is ideal for small groups while jeepneys, well of course, are for large groups who wish to visit the said mountain.

Team Love and Team Baby ko

Upon reaching the feet of Mt. Pico de Loro, we first proceed on the registration area near the jump off point. Registration fee is 25 pesos per head. There is also a comfort room in the  area and it is free of use where you can changed up your clothes. After that, we then head to the jump off point and started our trek. We started at around 4:30pm and expected to reach the campsite no over 8:30pm. 4 hours is the average time to hike this mountain. And Oh, there is another registration area on the Camp 1. Fee is 20 pesos and I don't know why there are two registration area with fee in this mountain.

2nd Registration area in Mt Pico de Loro
What I like about Mt Pico de Loro is its lush green surroundings. Its trails are fenced with tall trees which make shades for trekkers. Less rays coming from the sun during hike means more energy for trekkers. There are also some parts of the trail wherein fresh air breezes on you which is very refreshing for someone like me who lives in the city. Mt. Pico de Loro is a known hiking destination in Luzon and I would like to commend DENR because what you have implemented to protect this mountain is really working and efficient. Yes, this mountain is protected by the DENR.

Trail of Mt. Pico de Loro is a combination of easy trekking to average. The first part is quite easy as it will only requires you to walk into a slightly slanted trail going up. But as you reach the middle 'till up to the summit, trails are getting steeper. I also noticed that we are not constantly going up. There are parts wherein after we trekked up, the trail will lead into a down trail then up again which is very exhausting and draining. Good thing we started our trek late in the afternoon to almost dark. Mr. Sun almost settling down and the environment is getting humid.

Sir Jay, Sir Orlan and Ewin
After almost forever of trekking, walking in the dark... finally, we heard voices. It only means that we're near the campsite. So our spirits were lifted high and rushed hastily to the top. Approximately 3 hours, we were able to reach Mt. Pico de Loro's campsite. The scene at the campsite were like night market of the metro. Haha. There were lots of mountaineers that night. I've never seen a campsite wherein tents were pitch side by side. Take note, campsite of Mt Pico de Loro is quite big yet mountaineers able to fill that land area. Amazing! Luckily we're able to find a spot where we can pitch our tents. After that, we prepared our dinner, eat and had some socials. Then we decided to sleep as we will head to the summit the next morning.

Great morning!
Moment...
This has been my home for 1 night :)
[I guess] They woke up the next morning at 5am (me at around 6am). Lols. We had our packed hamburgers from Jolibee as breakfast then prepped up to descend at the summit of Mt. Pico de Loro. From the campsite, it took us 20 mins to reach the summit. I suggest extra caution should be taken when going to the summit as the wind blows hard on this part of the mountain. We can't barely stand straight due to the wind. I felt like it will blow my small body into the mid-air. That's how strong it was.

The summit
Jing and Julius
Sir Jay in his signature pose
We're up for this challenge!
Hold tight repa!
Upon reaching the summit is a 360-degree scenic view. Some place I had identified during my stay on top were the Manila Bay, Mt. Marami of Maragondon Cavite, Mt Talamitam and Mt. Batulao of Batangas and the Corregidor.

Awkward selfie pose hahahaha
We cant see straight... and stand straight hahaha
Congrats ladies! You've made it to the summit!
The campsite from the summit...
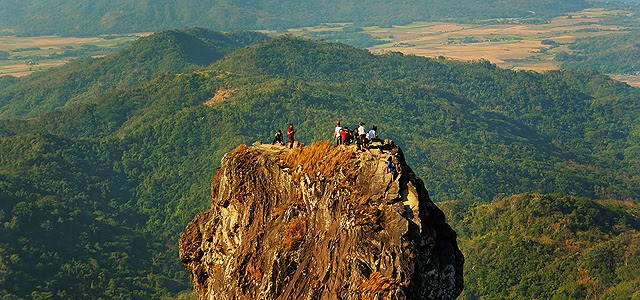
Aside from the view, you'll also see the pride of Mt. Pico de Loro on its other side - the monolith (also known as Parrot's Beak). Parrot's Beak of Mt. Pico de Loro is a vertical stone structure which stands at around 60 meters. Being able to reach its base is considered to be the most challenging part of this mountain. I attest to that. The trail going on top of it was (a bit) terrifying. I couldn't remember how many times I cursed and said bad words upon my climb up to the monolith. There are part of the trail that you'll be crossing an inclined stone. Some trails were even like my both feet is just right to the trail and a few more inch/step is already a ravine. Apart from having shoes/sandals with good grip, upper body strength is also required as there is a rope installed where you need to hang-on in order to continue the climb. Julius and I were both hesitant to rely all our weight on that rope because it doesn't seemed that strong. Hahaha. So again, be very careful. Accident to this point is really imminent so climbers should take another extra caution when conquering the monolith. After all those things we've been through, a feeling of accomplishment has been a great reward as we reach the base of Parrot's Beak. It is really recommendable to people who loves adventures and to those who are thrill seekers.

Time to descend! 
Terrifying part going to the base of the monolith
(right photo) zoom in mode
My 2nd visit to Mt. Pico de Loro has been a different experience. Plus I have accomplished what I promised to myself back in 2011 - to climb and reach the base of Parrot's Beak. We're blessed that day because the weather favored with us. It was such an amazing trek!

Side story: We climb Pico de Loro at night and we didn't got lost... however, when we descend back to the jump off the next day, and at daytime, we got lost. Hahaha. We didn't know why or how. But just remember that when you see a big trunk and a DENR sign on the trail, take the way up and not the straight way. Lols!

Breakdown of Expenses:
Bus (Coastal Terminal - Ternate Terminal) - 84 Pesos
Tricycle (Ternate Terminal - Jump-off point) - 75 Pesos/pax
Registration Area 1 - 25 Pesos
Registration Area 2 - 20 Pesos
Food - **.**
Read More

Wednesday, January 1, 2014

Mt Manabu of Sto Tomas, Batangas


I started the year 2013 by conquering Mt Timbak and almost reaching the peak of Mt Tabayoc, so I guess the best way to end my 2013 is also by exploring another mountain. I was blessed because I have been invited by my girlfriend's colleagues as they planned to conquer Mt Manabu.

Mt Manabu is located in the town of Batangas. It stands at 720 MASL and considered to be a good climb for newbies (in hiking) because of its relatively light trail. Mt Manabu derived its name from MAtaas NA BUndok which means "alp" or "high mountain". There are 8 stations in order to land on top of Mt Manabu and trekkers have 2 options to reach its peak. One of which is the normal trail wherein you'll be following the stations numerically. While the other one is you'll be taking stations 1 to 4 then take the trail straight to the grotto which is in Station 8. Please see the map below:

Mt Manabu is located at Brgy. Sta Cruz, Sto Tomas, Batangas
How to get there?
Take a Lipa or Lucena bound bus at LRT Buendia then inform the bus conductor to drop you off at Brgy. San Pedro, Sto Tomas. From Sto Tomas, ride a trike to "Sulok". Make sure to visit the Barangay Hall for registration before starting your trek. Registration fee is 20 pesos per pax. You can also ask for a guide here. Guide is around 300-500 pesos (depends on how good you are on bartering).

We reached the jump off point of Mt Manabu around 9PM. Yup, night trek is possible on Mt Manabu. Right after we registered at the barangay, we waste no time and started to trek. The first 4 stations were easy and light. However, the climb becomes more complex from Station 5 and up to the peak due to continuity of upward hike. The trail becomes steeper and challenging. Plus, the trail was muddy during our visit which we didn't expect because it was sunny that whole week. Some part of the trail have "lubid" installed. These ropes are located on sharp angled and steep trails. Trekkers swing to these ropes in order to help them continue on trekking. It was also fun because it added flavor or twist to Mt Manabu.

Shot as we descend at Mt Manabu
After almost 2 1/2 hours, we finally reached the campsite. Located between Station 5 and 6, Mt Manabu's campsite is quite big. It can accommodate large numbers of campers and the signal is pretty strong. We were 14 people in the group and we were able to pitch 7 tents along with other campers and still it is spacious.

Right after we pitched our tents, we started to prepare our late dinner. It was really cold up there so I recommend to pack up jackets and other thick clothes when planning to stay overnight at Mt Manabu. After some chit chat and socials we then took a rest.

Getting ready to descend
After packing our things, its time for some photo op
Konting pakilig lang... =]
The next day, we woke up early and took a light breakfast. Then we packed up our things as we will continue to explore Mt Manabu (particularly Station 7 & 8). In between station 6 & 7 lies a cross and marks that you already reached the peak of Mt Manabu. On the other hand, Station 8 hold a grotto. And because of these landmarks, Mt Manabu becomes a popular destination for Visita Iglesia.

Big cross found in between Station 6 and 7
Grotto at Station 8
Since we descend Mt Manabu on the morning, I appreciate the environment even more. The shades of the trail are very evident. Shades that come from its rich forest. The trail is surrounded by trees and plants. Nature is really being take care off at Mt Manabu. Kudos!

And because of those shades, it lessens the tiredness and perspiration we experienced on exploring this mountain. We were able to reach the jump off point again in 2 hours or less.

Shades. One of a few reason why I love Mt Manabu
Rich nature. Happy people.
Passing through Station 4
It was nice meeting new people. My experience with Mt Manabu was definitely a fun climb. I just hope fellow trekkers and people around the area maintain the cleanliness of this mountain for future generations.

Additional information: Comfort rooms are available in the jump off point. You may directly go here after your hike for a quick bath or to wash your shoes. You may also display there your wrecked shoes just in case you experience one during your climb. Lols.

We survived Mt Manabu! Wew!

Read More

Wednesday, September 18, 2013

My First Hike: Mt. Maculot and the "Rockies" of Cuenca, Batangas


It's time for some Throwback Thursday (Blog Edition)!

My love for mountain hiking started back in 2009 when I was invited by a college friend to have an overnight on top of a mountain. He has done hiking before and he wanted to encourage others, along with my other college friends, to try out this adventure. Overnight on top of a mountain sounds fun so everybody accepted the invitation... or should I say, the challenge? Paul (the one who invited us) chose Mt Maculot of Cuenca, Batangas. Reasons are: 1) It is considered an average in terms of its height in which it is ideal for newbies like us. 2) He's also familiar with the place because he'd already been to Mt Maculot.

PS: Please ignore our outfits in the following photos. They are inappropriate for hiking and we regret wearing them. #lol 

Cuenca, Batangas - Blurring out those campaign ads (Photo from Edward Calugtong)
How to get there:
From Buendia/Gil Puyat, take a bus going to Lemery. Usual bus rate is 147 pesos. Inform your conductor that you'll go at Mt Maculot and drop you off at Cuenca, Batangas. From there, you can hire a tricycle that will bring you to the jump off point of Mt Maculot. Fare is 20 pesos per pax. But before going to the jump off, ask your driver to stop you at the Registration Area which is near the Barangay Hall of Cuenca. Registration fee is 10 pesos per pax. Log everybody in the logbook. This is our first lesson about hiking. Never miss out to register because that will be used for emergency purposes.

Sign that we are heading to the right direction =] (Photo from Edward Calugtong)
After the registration, we headed at the jump-off point to gear up and start the hike. We started the hike with a prayer followed by a stretching. That's our second and third lessons. Always ask for guidance from our creator and prepare your body with this extreme adventure. These two are very important. We should never fail to ask assistance to God as this kind of sport comes with lots of danger. Also, stretch out to increase your range of motion, which means your limbs and joints can move further before an injury occurs.

Yup, this is our official outfits for Mt Maculot hike. #throwbackThursday  (Photo from Edward Calugtong)

I can still remember my excitement that day on this first hiking adventure of mine. I really don't know what to expect up there and I thought this was just a plain activity. Well, everybody is excited and oozing with energy on the first quarter as we went up to the peak of Mt Maculot. Everybody is chatting, laughing, joking and even singing. But those were minimized as we gone through the second and third quarter. Trails are getting stiffer and harder. We started to feel our weight and the weight of our things that we carry. Lesson number four: Only bring what you need. Do not bring unnecessary things. Just keep it light.  There are also some parts of the trail that requires you to grasp on soil, grass and branches in order to continue. Never hesitate to put your hands on this things. This is not the place for people who has an "attitude". One must have a strong legs and feet to surpass the obstacles. That makes us realize that this activity should be taken with precautions.

Start of our trek
Trail are getting difficult...
Everybody was tired and sweating hard. The sun sets to its highest position. Getting thirsty is inevitable. Fifth lesson: Have enough water supply. This is a vital thing that mountaineers should bring on every hike. Thank God, there are stalls in different parts of Mt Maculot that sells "buko" juice and other cold beverages. Yup, its cold but they're a bit pricey too. We bought drinks on most of the stalls we passed by. Having cold drinks in this tiring activity is priceless! You'll come to appreciate them. It is also a way to conserve our packed water. So instead of drinking them, we reserved it and will be used while our stay on top and going down the next day.

 Store in the middle of the trail | That's my friend, Julius (Photo from Edward Calugtong)
What I also noticed is that as we encounter other mountaineers, they always greet fellow mountaineers even they're are strangers. "Magandang umaga/tanghali/gabi sir/ma'am" (good morning/afternoon/evening sir/ma'am) and/or "ingat po" (take care) are the most commonly used greetings. That is lesson number six: greet fellow mountaineers.


Emac, Eteng and Julius finding doing their own ways
After 2 hours of trekking. The group finally reached the top! Our hard work paid off and what I felt upon reaching the top was un-explainable (but I know it's in a good way). The view on top of Mt Maculot is superb.

Heaven and Earth
Sunset at Mt Maculot
After a quick tour on top, we started to pitch our tent. The camp site of Mt. Maculot is quite big and can a accommodate large group of mountaineers. Then we started to cook and prepare our dinner. It was a great dinner even though only canned goods and noodles were served in the table ground. We talked about our experiences and thoughts as we went up to this mountain while eating. Energy is getting high again. The dinner was followed by socials. Lesson number seven: Have fun. Though hiking is an extreme activity, mountaineers should also enjoy and have fun!

EdPau pitching the tent
Socials that night - Pinoy Henyo and 1,2,3 pass (Photo from Edward Calugtong)
After the socials that night, all went to rest. And that was my first sleep on top of a mountain. Beat that!

The Rockies

Day 2 of our Mt Maculot Hike
The following morning, everybody woke up early to prepare and eat breakfast. This time we will be heading to a so-called place, Rockies. Rockies is a piece of Mt Maculot that offers its visitors an amazing view. Just refer on the photos below to see what I mean. It is just a 30 minutes or less of trekking from the camp site of Mt. Maculot. Extreme caution should be observed since the wind blows hard on this part of the mountain and the space on top of Rockies is a bit narrow.

Off our way to Rockies
We are young, wild and free... also extreme!
Edward and Paula - moments of love. Yiiiihiii
This shot is much better when taken zoom out...
Am I right? :]
After almost an hour of stay and photo op at Rockies, the group decided to descend back to our camp site and start trekking down. Lesson number eight arise here: Take Nothing but pictures, Leave nothing but footsteps, Kill nothing but time. No need to explain further, right?

Climbing Mt Maculot is definitely a great experience. Though trekking up and down can sweat the hell out of me, the view on top and the pride you may feel and get as you reach the peak pays off all those hard works. Just like the famous saying... No Pain, No Gain - I guess that's the ninth lesson.


Breakdown of Expenses:
Bus ride (Pasay to Lemery, Lemery to Cubao) - 300.00 PhP (two-way)
Tricycle (Lemery to Jump off, Jump off to Lemery) - 20.00 x 2 way = 40.00 PhP/pax
Registration - 10.00 PhP
Food: **.**

Read More