Showing posts with label Cavite. Show all posts

Friday, March 21, 2014

Mt Pico de Loro and the Parrot's Beak - Ternate, Cavite Route


Mt Pico de Loro is not new to me as this is already my second time to conquer this mountain. But like what every mountaineers say, every hike is different. The difference of this hike were 1) unlike my first climb, I only went there for a day hike. Now I'll be staying for an overnight. 2) We did a night trek going up and 3) lastly, I climbed the monolith slash the famous Parrot's Beak.

Just to give you a short background, Mt Pico de Loro (also called as Mt Palay Palay) is situated in the boundaries of Cavite and Batangas. While having said that, trekkers who wanted to climb Mt. Pico de Loro have a choice whether they'll start on the jump off point in Nasugbo, Batangas or the one which is located in Ternate, Cavite. Cool huh? Also, in Cavite it is considered to be as the highest point with a topography of 664 MASL (according to Pinoy Mountaineers).

How to get there?
Well since most of us in this trip were Cavitenos, we started our adventure on the jump off point located in Ternate, Cavite. Going there is just plain and simple. From Baclaran or Coastal Mall Terminal, ride a bus with a signboard going to Ternate. Tip: Make sure that it will passed through Cavitex as that is a much faster way to reach Ternate. You'll be dropping off at the last point which is the Ternate Terminal so getting lost on the way is impossible. Lols! Bus fare is 84 pesos and it will take 2-3 hours. Alight at Ternate Bus Terminal, you can rent a tricycle for 75 pesos per head or a jeepney (didn't know the price) going to the jump off point/registration area of Mt. Pico de Loro. Renting a tricycle is ideal for small groups while jeepneys, well of course, are for large groups who wish to visit the said mountain.

Team Love and Team Baby ko

Upon reaching the feet of Mt. Pico de Loro, we first proceed on the registration area near the jump off point. Registration fee is 25 pesos per head. There is also a comfort room in the  area and it is free of use where you can changed up your clothes. After that, we then head to the jump off point and started our trek. We started at around 4:30pm and expected to reach the campsite no over 8:30pm. 4 hours is the average time to hike this mountain. And Oh, there is another registration area on the Camp 1. Fee is 20 pesos and I don't know why there are two registration area with fee in this mountain.

2nd Registration area in Mt Pico de Loro
What I like about Mt Pico de Loro is its lush green surroundings. Its trails are fenced with tall trees which make shades for trekkers. Less rays coming from the sun during hike means more energy for trekkers. There are also some parts of the trail wherein fresh air breezes on you which is very refreshing for someone like me who lives in the city. Mt. Pico de Loro is a known hiking destination in Luzon and I would like to commend DENR because what you have implemented to protect this mountain is really working and efficient. Yes, this mountain is protected by the DENR.

Trail of Mt. Pico de Loro is a combination of easy trekking to average. The first part is quite easy as it will only requires you to walk into a slightly slanted trail going up. But as you reach the middle 'till up to the summit, trails are getting steeper. I also noticed that we are not constantly going up. There are parts wherein after we trekked up, the trail will lead into a down trail then up again which is very exhausting and draining. Good thing we started our trek late in the afternoon to almost dark. Mr. Sun almost settling down and the environment is getting humid.

Sir Jay, Sir Orlan and Ewin
After almost forever of trekking, walking in the dark... finally, we heard voices. It only means that we're near the campsite. So our spirits were lifted high and rushed hastily to the top. Approximately 3 hours, we were able to reach Mt. Pico de Loro's campsite. The scene at the campsite were like night market of the metro. Haha. There were lots of mountaineers that night. I've never seen a campsite wherein tents were pitch side by side. Take note, campsite of Mt Pico de Loro is quite big yet mountaineers able to fill that land area. Amazing! Luckily we're able to find a spot where we can pitch our tents. After that, we prepared our dinner, eat and had some socials. Then we decided to sleep as we will head to the summit the next morning.

Great morning!
Moment...
This has been my home for 1 night :)
[I guess] They woke up the next morning at 5am (me at around 6am). Lols. We had our packed hamburgers from Jolibee as breakfast then prepped up to descend at the summit of Mt. Pico de Loro. From the campsite, it took us 20 mins to reach the summit. I suggest extra caution should be taken when going to the summit as the wind blows hard on this part of the mountain. We can't barely stand straight due to the wind. I felt like it will blow my small body into the mid-air. That's how strong it was.

The summit
Jing and Julius
Sir Jay in his signature pose
We're up for this challenge!
Hold tight repa!
Upon reaching the summit is a 360-degree scenic view. Some place I had identified during my stay on top were the Manila Bay, Mt. Marami of Maragondon Cavite, Mt Talamitam and Mt. Batulao of Batangas and the Corregidor.

Awkward selfie pose hahahaha
We cant see straight... and stand straight hahaha
Congrats ladies! You've made it to the summit!
The campsite from the summit...
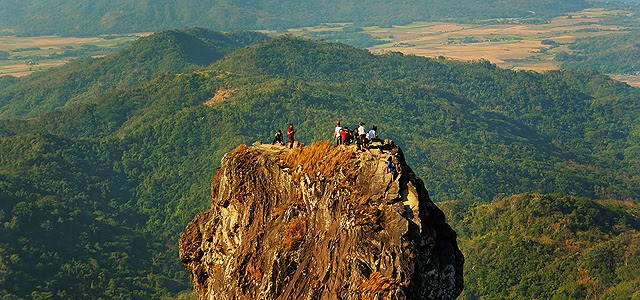
Aside from the view, you'll also see the pride of Mt. Pico de Loro on its other side - the monolith (also known as Parrot's Beak). Parrot's Beak of Mt. Pico de Loro is a vertical stone structure which stands at around 60 meters. Being able to reach its base is considered to be the most challenging part of this mountain. I attest to that. The trail going on top of it was (a bit) terrifying. I couldn't remember how many times I cursed and said bad words upon my climb up to the monolith. There are part of the trail that you'll be crossing an inclined stone. Some trails were even like my both feet is just right to the trail and a few more inch/step is already a ravine. Apart from having shoes/sandals with good grip, upper body strength is also required as there is a rope installed where you need to hang-on in order to continue the climb. Julius and I were both hesitant to rely all our weight on that rope because it doesn't seemed that strong. Hahaha. So again, be very careful. Accident to this point is really imminent so climbers should take another extra caution when conquering the monolith. After all those things we've been through, a feeling of accomplishment has been a great reward as we reach the base of Parrot's Beak. It is really recommendable to people who loves adventures and to those who are thrill seekers.

Time to descend! 
Terrifying part going to the base of the monolith
(right photo) zoom in mode
My 2nd visit to Mt. Pico de Loro has been a different experience. Plus I have accomplished what I promised to myself back in 2011 - to climb and reach the base of Parrot's Beak. We're blessed that day because the weather favored with us. It was such an amazing trek!

Side story: We climb Pico de Loro at night and we didn't got lost... however, when we descend back to the jump off the next day, and at daytime, we got lost. Hahaha. We didn't know why or how. But just remember that when you see a big trunk and a DENR sign on the trail, take the way up and not the straight way. Lols!

Breakdown of Expenses:
Bus (Coastal Terminal - Ternate Terminal) - 84 Pesos
Tricycle (Ternate Terminal - Jump-off point) - 75 Pesos/pax
Registration Area 1 - 25 Pesos
Registration Area 2 - 20 Pesos
Food - **.**

Read More

Monday, June 24, 2013

Boracay de Cavite - Marine Base Beach Resort of Ternate, Cavite


Security while having fun on the beach. That's how I would describe my experience in Boracay de Cavite Beach Resort which is also called as Marine Base Beach Resort. Yes, you read it right. Boracay de Cavite Beach Resort is situated inside a Philippine Marine Base found in Ternate, Cavite. So expect to see trainees and people in uniform while you are in the area. Having said that, you are guaranteed that this place is safe. So just enjoy!

How to get there?
From Baclaran, take a Saulog bus or a mini bus going to Ternate, Cavite. You'll be spending 85 Php if you take an AC bus and 70 Php for riding a mini bus. This will be a long drive so just charge yourself up before the actual swim. An estimate of 2 to 2 1/2 hours of traveling time before you reach Ternate bus terminal. From the bus terminal, you need to hire a jeepney because there are no public transportations available going to Boracay de Cavite. A 22 seater jeepney can be hired for 2,000 Php - 3,000 Php. This price is already round trip and may vary depending on how good you are in barking. So goodluck! As for those who'll be travelling in private vehicle, take the Coastal Road and go straight to Cavitex. Prepare 24 Php for the Coastal toll fee and 65 Php for the Cavitex toll fee. From Noveleta Exit, drive all the way going to Ternate. Before you reach Ternate, you'll be passing by the towns of Tanza and Naic. Note: Monitor your gas tank gauge because the most accessible gas station to Marine Base is in the city proper of Ternate. You'll know you're in the right direction if you got to see the jump off point of Mt Pico de Loro, Puerto Azul and Caylabne Bay Resort. Just drive until you reach the Main Gate of the Marine Base (which is hard to miss).

Main Gate of Marine Base
From the Main Gate, prepare your entrance fee. 100 Php is charge for a day swim and 200 Php for an overnight stay.  For those who'll be staying overnight, rooms (700 Php) and cottages (350 - 450 Php) are available in the beach side but if you want to cut from these fees you may bring your own tent and just set-up a camp. There's also a pay parking there - Motorcycle: 10 Php (day) / 20 Php (night), Car: 50 Php (day) / 100 Php (night). You need to go back again to your vehicle after paying all those fees because the beach part of this camp is still 2-3 kilometers away from the Main Gate.

Computing our fees :]
As we reach the beach area of Marine Base, I noticed the creamy (not white) and fine texture of its sand. And thought to myself that maybe it is one of the factor why this place is called, the Boracay of Cavite - Just maybe. The area is amazing. Never thought that Cavite has this kind of beach. Aside from the fine sand, it is surrounded by tall stone walls with waves splashing on it (like the one I see in the movies). Most importantly, the area and the water of Boracay de Cavite is clean.

Nice sand and calm water
We brought our own tent

Aside from the tent, we also rented a hut
It is also recommendable for family outings and reunions. Kids will definitely enjoy Boracay de Cavite because the water level of this beach doesn't change drastically. So, kids and teens can enjoy their swim for as long as they know their limits.

Ate Rain and her cute kids
Swimming time!
Visitors can also play beach volleyball. There is a dedicated place for this sport in the mid part of the area and I believe it is for free of use. Just bring your own ball. It is also ideal for other games and team building activities provided that it has a wide area to roam around.

Playball!

A Sari-Sari store is also available in the area. So if you forgot to bring chips and toiletries, you can buy things there. The comfort room is OK. All covered up and there's no problem with the water supply.

Look how beautiful this place is...

There's not so much amenities in Boracay de Cavite provided that it is a Marine base after all, but I truly enjoyed my visit there. The water and the view is enough for me to say that others should also stop by Boracay de Cavite - Marine Base Beach Resort.

Pack up! EOD... aw (me and my girlfriend)
Before we left Boracay de Cavite - Marine Base Beach Resort...
Breakdown of Expense:
AC Bus (Baclaran to Ternate, round trip) - 170 Php
Jeepney Rental (Ternate to Marine Base, round trip) - 2,000 Php (good for 22 people)
Entrance Fee - 100 Php
Parking Fee - 50 Php (divided by number of people)
Cottage - 450 Php (divided by number of people)
Food - **.** Php


Update!!! (March 3, 2014)

from Ehrm.Bas (Thank you for giving me and my other readers an update! =])

Some were asking for contact numbers, or how you can make reservations.

The answer is they don't entertain reservations in the Ternate Marine Base, and they don't have a landline that they'll give away. However if you have a party of 20 or so people, you can make reservations by going to Marine Barracks Rudiardo Brown (Marine Base Manila) in Fort Bonifacio, Makati. Ask the MP guarding the gate where MC7 is. That is where you can make reservations (you have to pay there also), and they'll be the ones who will contact the personnel in Marine Barracks Gregorio Lim in Ternate.

And if anyone wants to ask the "is it still open to the public" question in year 2015 or 2016, just go to the Marine Barracks in The Fort described above and ask the personnel there.

Some were asking if they will still be allowed to enter the premises if they leave Manila at night.

The gate of Marine Barracks Gregorio Lim is only open from 5AM to 10PM, daily. The MP won't let you in outside those hours. Make sure you have a reliable vehicle if going there alone as there are no street lights in the road going up, and almost no settlements - though the road is very nice.

Additional information:

  • There are two stores, and one of them accepts cooking service, also from 5AM to 10PM, for a modest fee.
  • Signal on Smart is erratic, at best you'll get 2 bars of 3G signal, then sometimes you get dropped to GPRS or 2G.
  • Signal on Globe while on the beach front is awesome. I was consistently getting HSPA/HSPA+ signals while in there and encountered no problems uploading 3MB photos.

BORACAY DE CAVITE IS CLOSED UNTIL MAY 16,2014


Read More

Monday, May 20, 2013

Corregidor Island via Sun Cruises


Corregidor Islandfalls under the territory of Cavite and lies at the entrance of Manila Bay. This island played an important role during World War II  where Philippines fights the Japanese forces from its invasion. Corregidor was vigorously attacked in the latter part of the war where it serves as a grave to many Americans, Japanese and Filipinos who fought during that time. Today, Corregidor Island is a popular tourist destination where people can visit and still see the remnants (e.g cannons, tunnel, etc...) of the said war. So for those who are fond of Philippine history, I suggest you visit Corregidor.


How to get there?
It's super easy. I recommend you get the service of Sun Cruises -- just like what I did. Sun Cruises provides ferry transfer and tour(optional) to Corregidor Island. I had no hard time contacting and reserving tickets from them for this Corregidor trip. Their reservations office is located at the CCP Complex, Roxas Blvd., Pasay City or you can reach them through e-mail (suncruises@magsaysay.com.ph) and landline (917 513-2625 or 922 337-0068 ) for ticket reservations. For more info and packages that they offer, just visit their website: http://www.corregidorphilippines.com/.

My Corregidor trip with my girlfriend starts when we arrived at the port of Sun Cruises near CCP Complex. It is a well known establishment there so just ask the people around if you are in doubt of directions. We boarded and checked in at exactly 7:30am and departed from Manila at 8:00am just like what they mentioned on their itinerary. It was hassle free and very convenient. It was also well organized and the ferry going to the island is fully air-conditioned for which I didn't expect.

At the Corregidor Port (Photo from Faye Nuestro)

After one hour and fifteen minutes of sailing, we finally reached Corregidor Island. And the place is amaaaazing! We also noticed that most of our co-passengers were foreigners. So local guy like me should be prepared in case they ask you something. Haha. I also hope more Filipinos visit the island and see how beautiful this place is. This is a good option for those people who wants to escape the city noise even just for a while.

Stunning!

I didn't get Sun Cruises tour since I am not a super fan of history. I am more to an adventurous type of traveler. And I've heard that Corregidor has a lot to offer that will suit my personality. So even if you are not into the history thing like me, you can still enjoy this trip. Aside from that, the view of this island is worth travelling for...
Islands near Corregidor gives photos a nice backdrop

What to do:
Lights and Sound Show at Malinta Tunnel - Php200.00/person
The Rocket (Zipline) - Php100.00/person
Outdoor Activities (Sunset and Sunrise viewing, Tunnel Lateral Tour) - Php250.00/person
Kayaking - Php500.00/hr.
ATVs (All-terrain vehicle) - Php500.00/hr.

Lights and sound show at Malinta Tunnel
Here's what you can inside the cave
After all those activities stated above, you can go swimming which is also found at the activity area of the island. The sand may not be white unlike the other beaches in the Philippines but the water here is clear and people really take good care of it. Me and my girlfriend really enjoy the water even we started splashing on it in the afternoon. It was refreshing.

Look how clear the water is... (Photo from Faye Nuestro)
Relaxing under the shade of a tree
Regarding the food, there's a hotel where you can buy food at the island but I suggest to bring your own since it is allowed and it will be much cheaper.

This trip is a must try. It drained our energy in a positive way (huh? hehe). We arrived back to Manila at around 4pm which ends this trip. I hope I can go back here again and try other activities and visit the other parts of the island. Maybe someday.

Read More

Monday, February 25, 2013

Mt Marami of Maragondon, Cavite


Plenty, lots and many. These are just some of the synonyms for the Tagalog word MARAMI. It was so called Mt Marami because of the many rocks that formed this mountain. If Pico de Loro has "Parrot's Beak", Mt Marami has its own "Silyang Bato". An enormous composite of rock pillars.

Though this mountain situated at Maragondon, Cavite only stands at 405 MASL (according to Pinoymountaineer), the average trek time to reach its peak is 5-6 hours. It is because Mt Marami's trail is a circulating elavation. The trek to Mt Marami can also be accompanied to the word "ligaw" or lost. Not only it has a lot of rock towers, it also have a lot of misleading trails. It's like a labyrinth of bewildering trails. So having a guide is strongly recommended if you want to visit Mt Marami but we don't, so we went to a lot (a mean "maraming marami") traversing this mountain.

How to get there?
From Manila, take a bus at Baclaran going to Naic, Cavite (65 pesos). Travelling time is about 2 1/2-3 hours. As you reach Naic, take a jeepney going to Magallanes (30 pesos). Just tell to your jeepney driver to drop you at Brgy. Ramirez which is just 10 minutes away from the town proper. Then when you reach Brgy Ramirez look for Brgy. Councilor Punongbayan's house. This will be your registration point before you can start your trek. Prepare 20 pesos/pax for registration fee. You can also ask for a local guide here which costs 300-500 pesos/day.

We conquered the heat and the talahib (photo from Cheers Masa's FB)
(photo from Cheers Masa's FB)
There are 2 rivers that you'll pass through in this trek. The first one is "Ilog na Kayrayag" and the next one is Bangkaan river. This two river can go knee high during rainy season so the best season to visit Mt Marami is after the wet season and summer. Aside from that, trails here can easilly get muddy so it will be more difficult (of course). However, traversing Mt Marami during summer has its own downside. Prepare your skin protector gears and make sure to have a maximum SPF lotion because it can get sweltering hot at noon time. Frequent re-hydration is a must to prevent heat stroke.

Rest mode (photo from Cheers Masa's FB)
Photo inception... (photo from Cheers Masa's FB)
(photo from Cheers Masa's FB)

Well, I have noticed that my blog entry for this mountain can make my reader retreat from trekking Mt Marami. Please don't. Because above all, a dramatic view on its peak awaits which is very rewarding after the long, confusing trail and sweaty adventure (I'm being negative here again, am I?). Because aside from the colossal and breathtaking rock formations set in an enticing background, a panorama of the Maragondon mountains which include Mt Pico de Loro, Mt Mariveles, and Mt Banahaw are can be seen at the summit. This is a great spot for photo op :]

Photo Op at the tip of this rock (photo from Cheers Masa's FB)
KASAMA (KAbataang SAbik MAmundok) at Mt Marami (photo from Cheers Masa's FB)
Breakdown of budget
Bus (Manila - Naic, roundtrip) - 130 pesos
Jeepney (Naic - Magallanes, roundtrip) - 30 pesos
Local guide (optional but I recommend to have one) - 200-300 pesos
Registration fee - 20 pesos
Food - *.**

This flower looks like... ... ... nevermind (photo from Cheers Masa's FB)


Read More